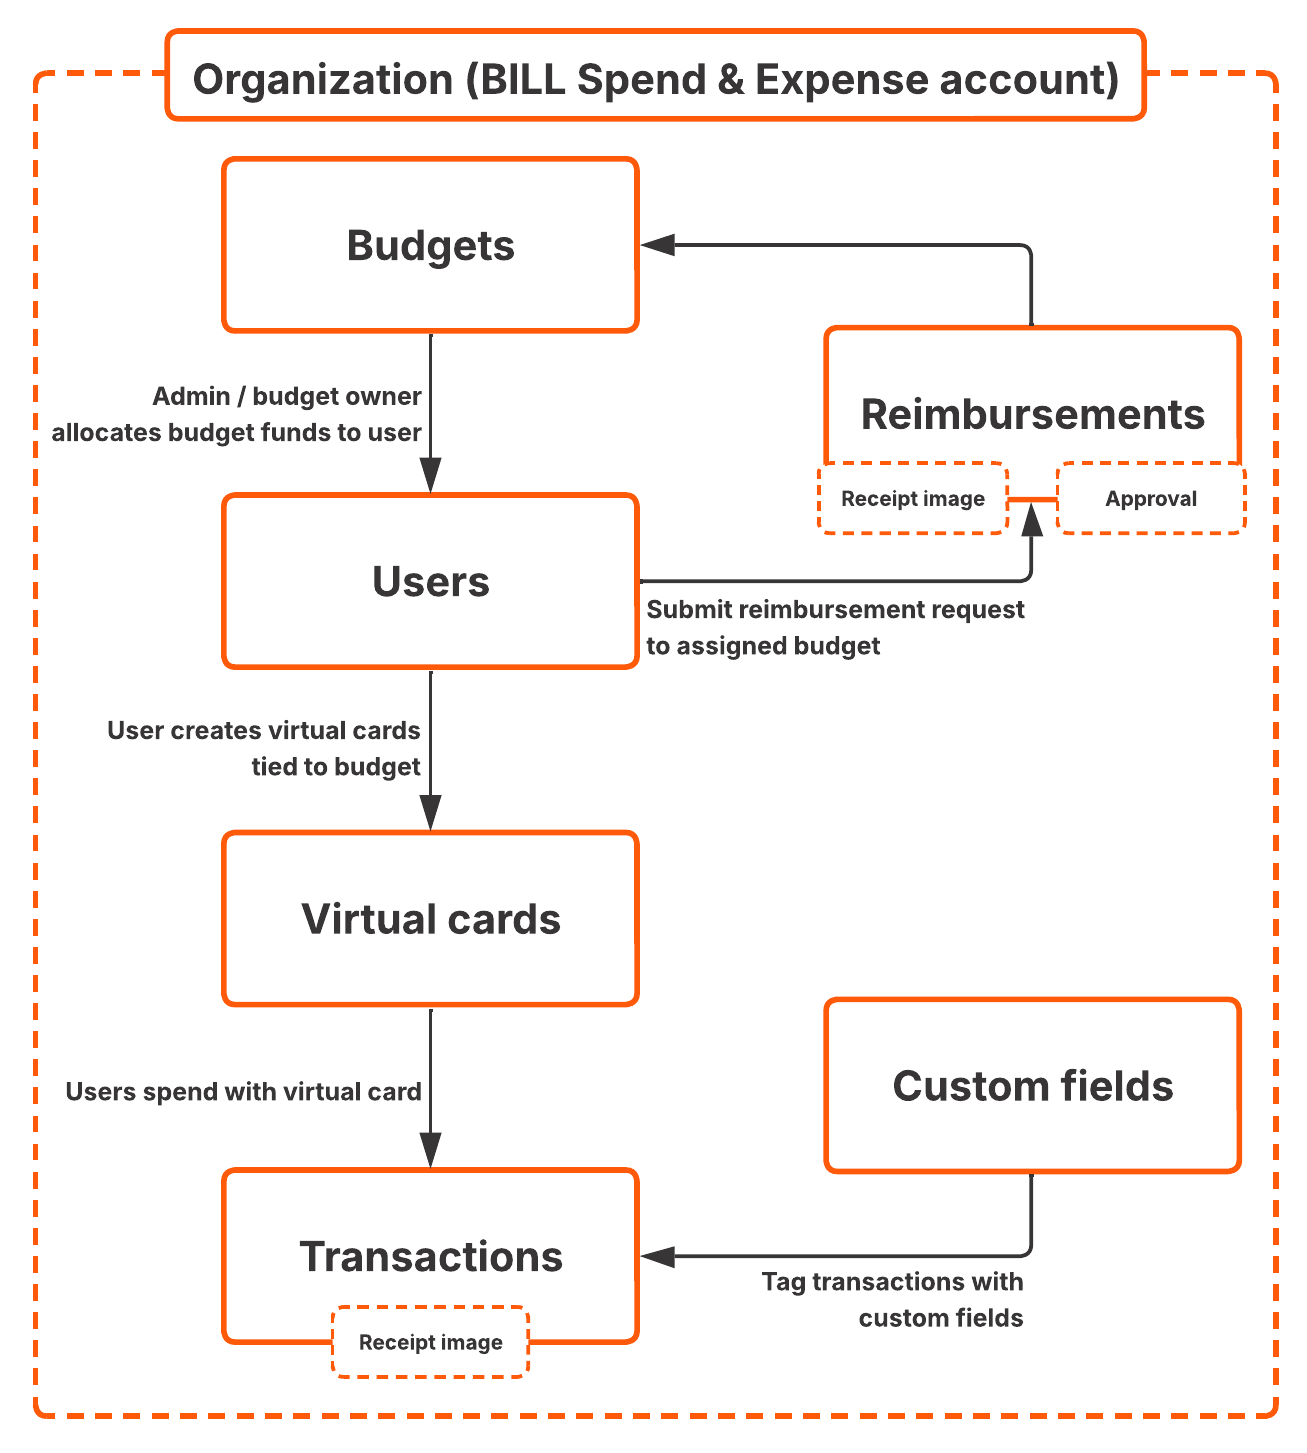
Expense management with S&E users, budgets, & cards
With the BILL Spend & Expense API, you can build with card and expense management services. No more hunting down who spent $200 on artisanal coffee beans and another $75 on limited edition neon sticky notes! Set up budgets, assign users to budgets, and set up cards for users to stick to their budgets. Set control policies at each level along the way.
What you'll build
In this recipe, you create an integration with the S&E API in the sandbox environment.
- Create a Spend & Expense user. Define the user role and personal information.
- Create a budget. Define a set of budget rules and assign the user to the budget.
- Create a virtual card. Issue a virtual credit card to the user for the created budget.
What you need before you begin
| Prerequisite | Description |
|---|---|
| API basics | A basic understanding of working with API endpoints. |
| API token | Your API token is required for your build with the BILL Spend & Expense API. If you have not set up your API token, sign up to create your sandbox BILL Spend & Expense account. When you sign up, you generate an API token. See Authentication with Spend & Expense API token for detailed steps. |
Enter your generated API token
Enter your generated API token below. You use this apiToken in all subsequent BILL API requests.
https://gateway.stage.bill.com/connecthttps://gateway.prod.bill.com/connectChapter 1: Create a new Spend & Expense user
In this chapter, you create a new Spend & Expense user with the API.
As a Spend & Expense user, you can perform a set of Spend & Expense operations based on the user role (ADMIN, AUDITOR, BOOKKEEPER, or MEMBER). See User roles in BILL Spend & Expense in the BILL Help Center to learn about user roles.
When you create a new Spend & Expense user with POST /v3/spend/users, you create a new user record in your sandbox BILL Spend & Expense account. This user represents an employee in your business. In this workflow, you create a new MEMBER user. Click Body below to view an example body for the Create a user API request. Click Send to create a new user.
In the response, a BILL-generated Spend & Expense user uuid is available for the Clark Spenderson user. You can sign in to the BILL web app to view this created user in your Spend & Expense dashboard. In Chapter 2, you create a new budget for this user.
Chapter 2: Create a new budget
In this chapter, you create a new budget. A budget enables you to set spending policies and keep entire teams of users on budget. You can set up multiple budgets based on different needs, such as expiration date, limit, and budget reset interval.
Step 1: Get the budget owner user
To create a new budget, you first need the BILL-generated UUID of a budget owner. Think of this owner as an administrator that assigns budgets to employee users in your business. In this workflow, you use your own user UUID as the budget owner.
Click Send to get the BILL-generated UUID of the current user with GET /v3/spend/users/current.
In the response, you get the uuid of the current user. In Step 2, you use the uuid to create a new budget.
Step 2: Create a budget & assign the current user as the budget owner
Create a new MONTHLY budget of $200 with POST /v3/spend/budgets. In addition, the current user uuid from Step 1 is set as the budget owner.
Click Body below to view an example body for the Create a budget API request. Click Send to create a new budget.
In the response, a BILL-generated budget uuid is available. In addition, the budget policy rules are available, such as startDate, currentPeriod budget funds, and spent budget funds. You can sign in to the BILL web app to view this created budget in your Spend & Expense dashboard. In Chapter 3, you assign the Clark Spenderson user (created in Chapter 1) to the budget.
Chapter 3: Assign the user to the budget
In this chapter, you assign the Clark Spenderson user (created in Chapter 1) to the budget (created in Chapter 2). Click Body below to view an example body for the Add or update a budget member API request.
In the example request, both the limit and recurringLimit values are set as 0 to NOT share any current budget funds or future budget funds with the user. This is because in Chapter 4, you will assign the entire $200 budget to the user with a virtual card.
In the Production environment, when you set the limit and recurringLimit values for a user, a virtual card is automatically created for the user. See Send funds to budget members in the BILL Help Center for more information.
Click Send to assign the user to the budget with PUT /v3/spend/budgets/{budgetUuid}/members/{userUuid}.
In the response, you see that the Clark Spenderson user is assigned to the budget. In addition, the budget spend policy rules are assigned to the user. In Chapter 4, you create a new virtual card for the Clark Spenderson user. The user can spend the budget funds with this virtual card.
Chapter 4: Create a new virtual card for the user
In this chapter, you create a new virtual card for the Clark Spenderson user. With this card, the user can spend the budget funds assigned to them.
A card represents a unique 16-digit number that is generated and linked to your Spend & Expense account. Cards can be physical or virtual. With a card, you can set limits based on different needs, such as budgets, users, and expiration date. In addition, you can associate cards with specific vendors.
In this workflow, you create a new virtual card and assign it to a budget and user. In addition, you set a limit for the card. Click Body below to view an example body for the Create a card API request. Click Send to create a new card.
In the response, a BILL-generated card uuid is available. In addition, the currentPeriod information tells you the current card usage. You can sign in to the BILL web app to view this created card in your Spend & Expense dashboard.
The status for all created cards is set as FROZEN in the sandbox environment.
Congratulations! The Clark Spenderson user is now ready to spend the assigned budget funds with this virtual card. They can simply add the card to their digital wallets and use the card funds.
What you learned in this recipe
You just completed the BILL expense management workflow with the BILL v3 API. You learned a lot along the way.
- Create a new Spend & Expense user. Assign the appropriate user role. Learn about the different user roles available.
- Create a new budget. Define a budget owner, and a set of budget rules.
- Assign the user to the budget. Control the budget limits for the user.
- Create a new virtual card. Assign the card to the correct budget and correct user. Control the spend limits on the card for the user.
Updated 15 days ago