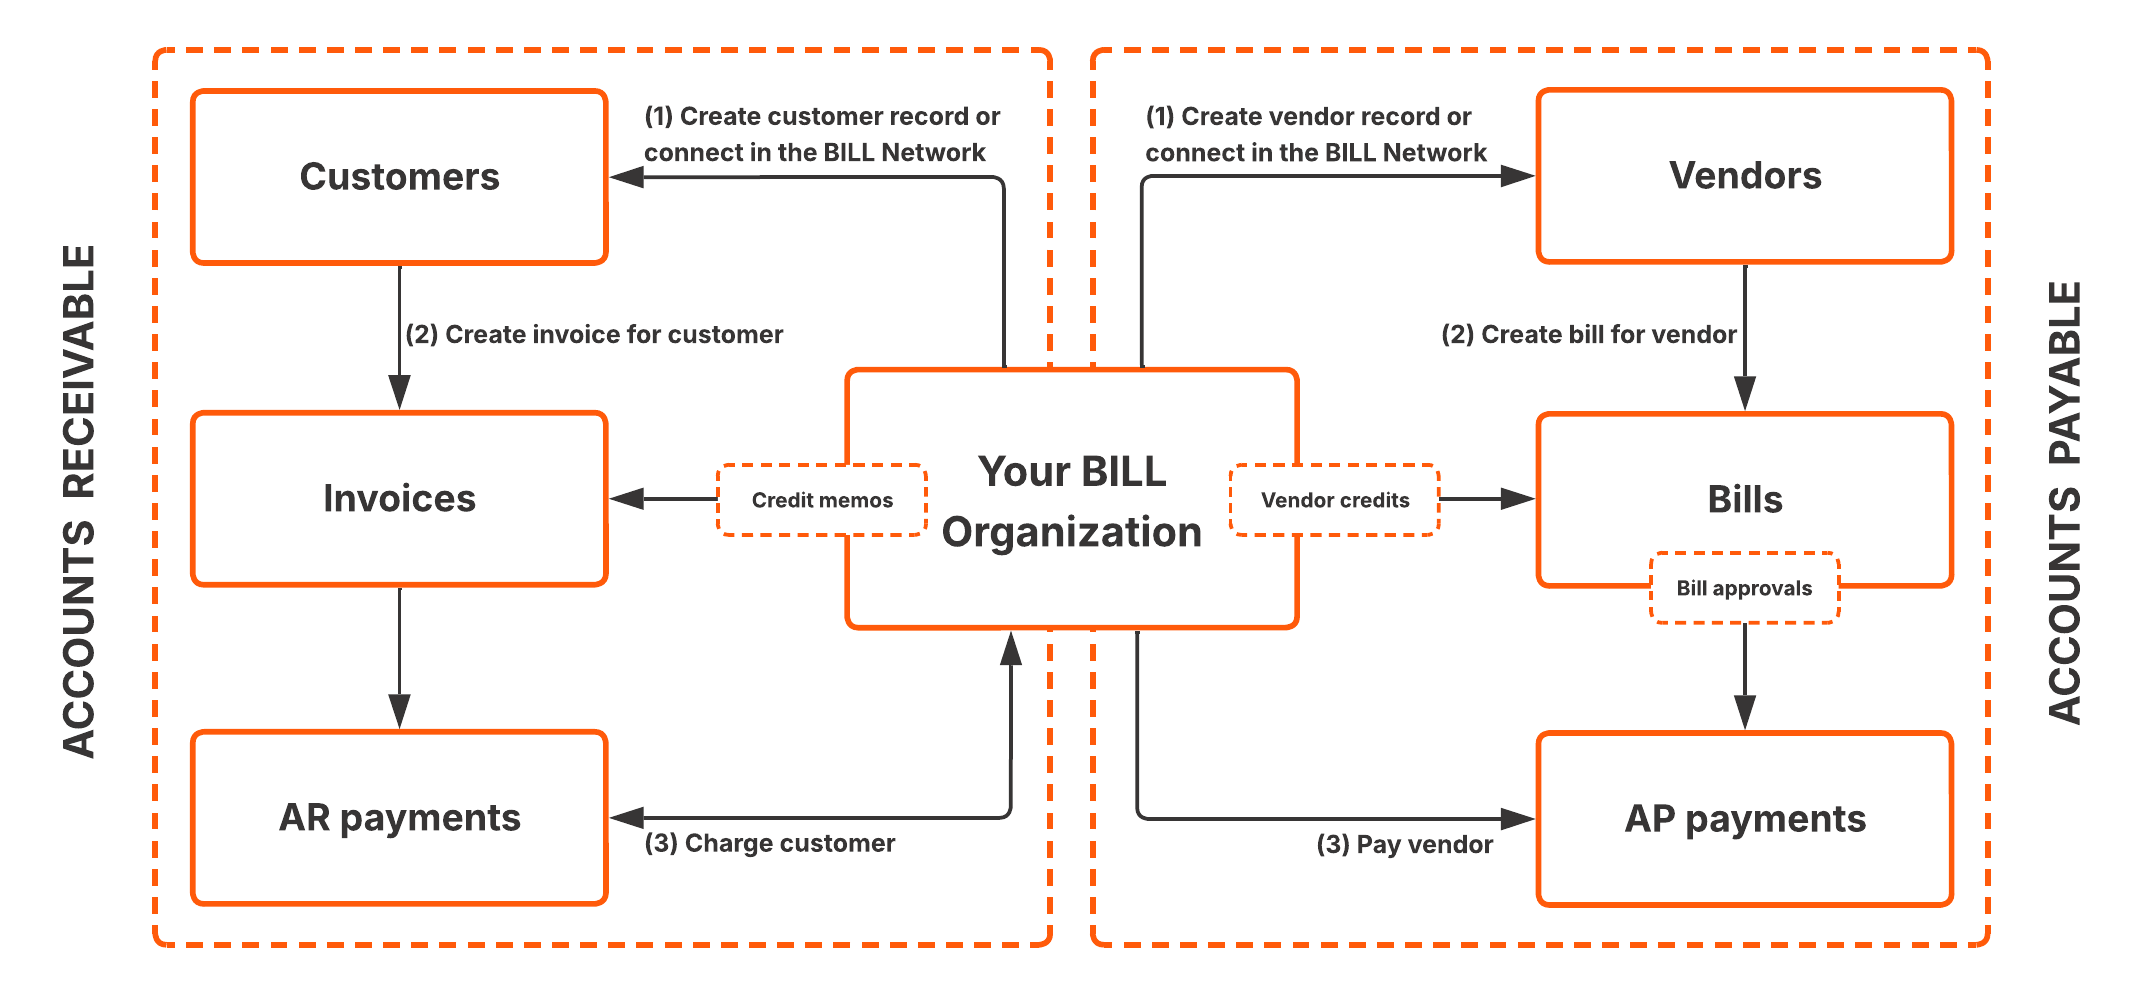
BILL AP workflow
The BILL v3 API gives you access to the same infrastructure that powers the BILL Accounts Payable (AP), Accounts Receivable (AR), and Spend & Expense (S&E) products. In addition, you can receive real-time event notifications with webhooks.
In this recipe
In this recipe, you build an AP workflow with the API. With this workflow, you set up a vendor record in your BILL organization, create a bill for the vendor, and then create a payment to the vendor.
What you'll build
In this recipe, you create an integration with the BILL API in the sandbox environment.
- Set up a vendor record in your BILL organization.
- Create a bill for the vendor.
- Get details about a verified bank account in your BILL organization.
- Create a payment to the vendor.
What you need before you begin
| Prerequisite | Description |
|---|---|
| API basics | A basic understanding of working with API endpoints. |
| Credentials | Your credentials are required for you to build with the BILL AP & AR API. If you have not set up your credentials, sign up to create your sandbox BILL account. When you sign up, you create a test BILL organization, and you generate your username, password, organization ID, and developer key. See Sandbox API sign up for detailed steps. |
| Test bank account | A test bank account added in your BILL organization. You use this test bank account to create a test payment in this recipe. See Sandbox API bank account setup for detailed steps. |
Chapter 1: API login
In this chapter, you login to your BILL account with the API.
To begin, enter your API login credentials in the fields below. See the What you need before you begin section in this recipe if you have not set up your credentials.
https://gateway.stage.bill.com/connecthttps://gateway.prod.bill.com/connectComplete your API login with the required credentials. Simply click Send to get a 200 OK response.
In the response, a new sessionId is available. You use this sessionId and your devKey in all subsequent BILL API requests. A 200 OK response confirms that you are a signed-in user. The sessionId expires after 35 minutes of inactivity. At that point, you are automatically signed out, and you must sign in again with the API login endpoint and generate a new sessionId.
Note that the trusted field in the response is set as false. When the API login session is MFA-trusted, the trusted field is set as true. We enable MFA in this API session in Chapter 2.
Chapter 2: MFA
In this chapter, you step up your current API session as MFA-trusted. BILL requires MFA for creating payments with the API. In the next set of steps, you first generate an MFA challenge, validate the MFA challenge, and then step-up the API login session as MFA-trusted.
Step 1: Generate MFA challenge
Generate an MFA challenge ID with POST /v3/mfa/challenge. Click Send. You receive a 6-digit token sent to your phone number.
In the response, a challengeId is available. You use this value in Step 2.
Step 2: Validate MFA challenge
Validate the MFA challenge with POST /v3/mfa/challenge/validate. In the request, set the required fields, and then click Send.
- Set
tokenas the 6-digit token sent to your phone number. - Set
deviceandmachineNameas a test device name. For example,test-device. Device name is required in the next step.
In the response, a rememberMeId is available. You use this value in Step 3.
Step 3: Step-up API session as MFA-trusted
Step-up your API session as MFA-trusted with POST /v3/mfa/step-up. In the request, set device as the device name used in Step 2, and then click Send. Your current API session is now MFA-trusted.
In the response, trusted is set as true. Your API session is now MFA-trusted.
Chapter 3: Set up a new vendor record
In this chapter, you create a new vendor record in your BILL organization.
A vendor in BILL is an organization that you pay for goods and services they provide. When you create a vendor with POST /v3/vendors, you add a new vendor record in your BILL organization.
Click Body below to view an example body for the Create a vendor API request. In the request, the vendor mailing address, payeeName, and bankAccount is set to enable ACH payments for the vendor. Click Send to create a new vendor record.
In the response, a BILL-generated vendor id is available. You can sign in to the BILL web app to view this vendor record in your BILL organization. The vendor id is required for you to create a bill in Chapter 4.
Chapter 4: Create a bill
In this chapter, you create a bill in your BILL organization.
A bill represents an amount owed for goods and services provided by a vendor. When you create a bill with POST /v3/bills, you create a new bill record for the test vendor from Chapter 3. Click Body below to view an example body for the Create a bill API request. Click Send to create a new bill.
In the response, a BILL-generated bill id is available. You can sign in to the BILL web app to view this bill in your BILL organization. The vendor id is displayed to show that the bill is created for the vendor.
Chapter 5: Create a payment
In this chapter, you first get details about your test bank account, and then you create a payment in your BILL organization.
Step 1: Get details about your test bank account
BILL requires information about your BILL organization bank account before you can create a payment. Click Send to get the list of test bank accounts in your BILL organization with GET /v3/funding-accounts/banks.
In the request, the ?filters=status:eq:"VERIFIED" query parameter enables you to filter the list of verified test bank accounts. If you do not have a test bank account in your sandbox BILL account, see Sandbox API bank account setup for detailed steps.
Step 2: Pay the vendor bill
A payment represents the transfer of funds to a vendor for a bill. When you create a payment with POST /v3/payments, you create a new payment record for the test bill from Chapter 4. In the request, the funding account id is set as the id of a verified test bank account (from Step 1).
Click Body below to view an example body for the Create a payment API request. Click Send to create a new payment.
Congratulations! You have created a test payment. In the response, a BILL-generated payment id is available. You can sign in to the BILL web app to view this payment in your BILL organization. An email is also sent to your email address about the scheduled payment to the test vendor.
What you learned in this recipe
You just completed the AP workflow with the BILL v3 API. You learned a lot along the way.
- Create an API session and perform MFA step-up.
- Create a test vendor record in your BILL organization.
- Create a bill for the vendor and pay it with the API.